Difference between revisions of "Protothreads"
From emboxit
m (1 revision) |
|
(No difference)
| |
Latest revision as of 16:51, 11 September 2015
Contents
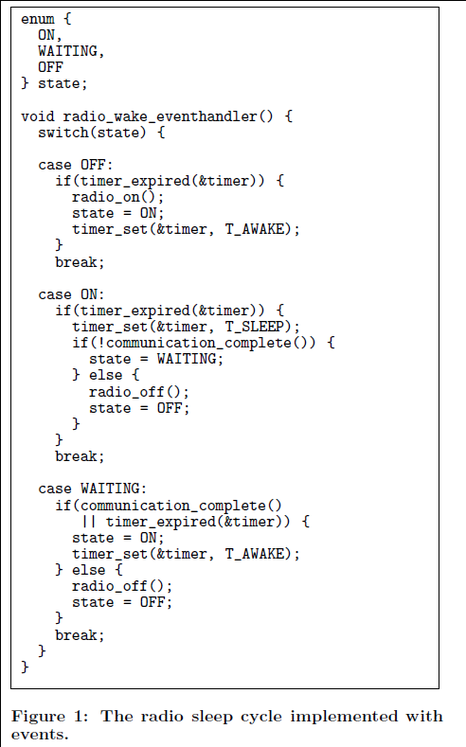
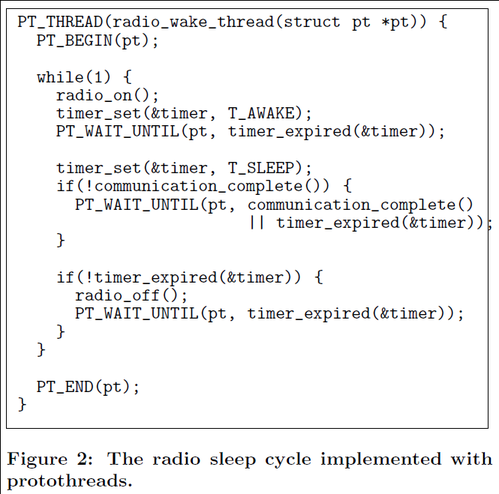
To understand it
1. Turn radio on.
2. Wait for Tawake milliseconds.
3. Turn radio off, but only if all communication has completed.
4. If communication has not completed, wait until it has completed. Then turn off the radio.
5. Wait for Tsleep milliseconds. If the radio could not be turned off before Tsleep milliseconds
     because of remaining communication, do not turn the radio off at all.
6. Repeat from step 1.
With the event-driven model, the programmer must explicitly design and implement a state machine.
With protothreads, the state machine is automatically generated.
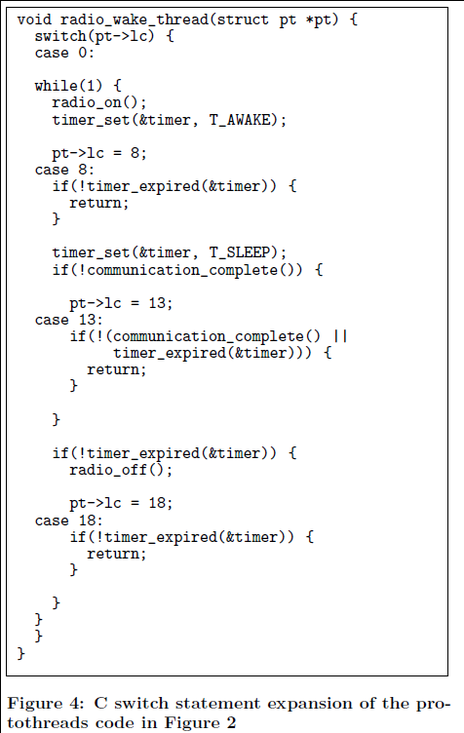
The non-obviousness of the C switch implementation of local continuations is that the technique appears to cause problems
when a conditional blocking statement is used inside a nested C control statement.
For example, the case 13: statement in Figure 4 appears inside an if block, while the corresponding switch statement is located at a higher block.

*** However, this is a valid use of the C switch statement: case statements may be located anywhere inside a switch block. ***

They do not need to be in the same level of nesting, but can be located anywhere, even inside nested if or for blocks.
This use of the switch statement is likely to first have been publicly described by Du [2].
The same technique has later been used by Tatham to implement coroutines in C [13].
- Protothreads: Simplifying event-driven programming of networked embedded tiny devices MuneebAli
- Using Protothreads for Sensor Node Programming DunkelsSchmidtVoigt05.pdf
- Memory-Constrained Embedded Systems Adam Dunkels, Oliver Schmidt, Thiemo Voigt, Muneeb Ali
Protothreads Home
- Protothreads Home: Protothreads - Lightweight, Stackless Threads in C http://www.sics.se/~adam/pt/
- Protothreads Library 1.4 Examples
- http://www.sics.se/~adam/pt/examples.html
- Protothreads - Lightweight, Stackless Threads in C How protothreads really work
What goes on behind the magical macros in the C protothreads library? Why are they macros? How do the macros work? Read on for the explanation.
In the C implementation of protothreads, all protothread operations are hidden behind C macros.
The reason for building the protothread library on C macros rather than C functions is that protothreads alter the flow of control.
This is typically difficult to do with C functions since such an implementation typically would require low-level assembly code to work.
By implementing protothreads with macros, it is possible for them to alter the flow of control using only standard C constructs.

This page explains how protothreads work under the hood.
We do this by taking a look at how the C preprocessor expands the protothread macros, and by looking at how the resulting C code is executed.
Download
Protothread Examples From third parties
An easy example for Arduino I have tested
- protothread and arduino, a first easy example From blog: "build hardware and write code for it"
- 2011.09.13
- Library downloaded and installed
- to C:\Program Files\arduino-0022\libraries
- removed files “example-buffer.c”, “example-codelock.c” and “example-small.c”
- Code is compiled with no errors
- Library downloaded and installed
- My Version:
//NX 2011.09.13
//NX Modify to use 2 Leds
//NX Each Protothread toggles different Led
//NX Third Led toggles in the main loop
//NX Works
//NX Each Protothread here is only a non blocking wait and Led toggle
//NX But protothread can  do much more (more waits, conditionals, change STATEs...)
//NX It is a clever and low-cost Thread

#include <pt.h>   // include protothread library

//#define LEDPIN 7  // LEDPIN is a constant

static struct pt pt1, pt2; // each protothread needs one of these

void setup() {
  pinMode(7, OUTPUT); // LED init
  pinMode(6, OUTPUT); // LED init
  pinMode(5, OUTPUT); // LED init
  PT_INIT(&pt1);  // initialise the two
  PT_INIT(&pt2);  // protothread variables
}

void toggleLED(unsigned char pin_no) {
  boolean ledstate = digitalRead(pin_no); // get LED state
  ledstate ^= 1;   // toggle LED state using xor
  digitalWrite(pin_no, ledstate); // write inversed state back
}

/* This function toggles the LED after 'interval' ms passed */
static int protothread1(struct pt *pt, int interval) {
  static unsigned long timestamp = 0;
  PT_BEGIN(pt);
  while(1) { // never stop
    /* each time the function is called the second boolean
    *  argument "millis() - timestamp > interval" is re-evaluated
    *  and if false the function exits after that. */
    PT_WAIT_UNTIL(pt, millis() - timestamp > interval );
    timestamp = millis(); // take a new timestamp
    toggleLED(7);
  }
  PT_END(pt);
}
/* exactly the same as the protothread1 function */
static int protothread2(struct pt *pt, int interval) {
  static unsigned long timestamp = 0;
  PT_BEGIN(pt);
  while(1) {
    PT_WAIT_UNTIL(pt, millis() - timestamp > interval );
    timestamp = millis();
    toggleLED(6);
  }
  PT_END(pt);
}

void loop() {
  protothread1(&pt1, 50);    // schedule the two protothreads
  protothread2(&pt2, 200);   // by calling them infinitely
  toggleLED(5);              // NX To measure the loop frequency: ~11.2 KHz ~100us
}
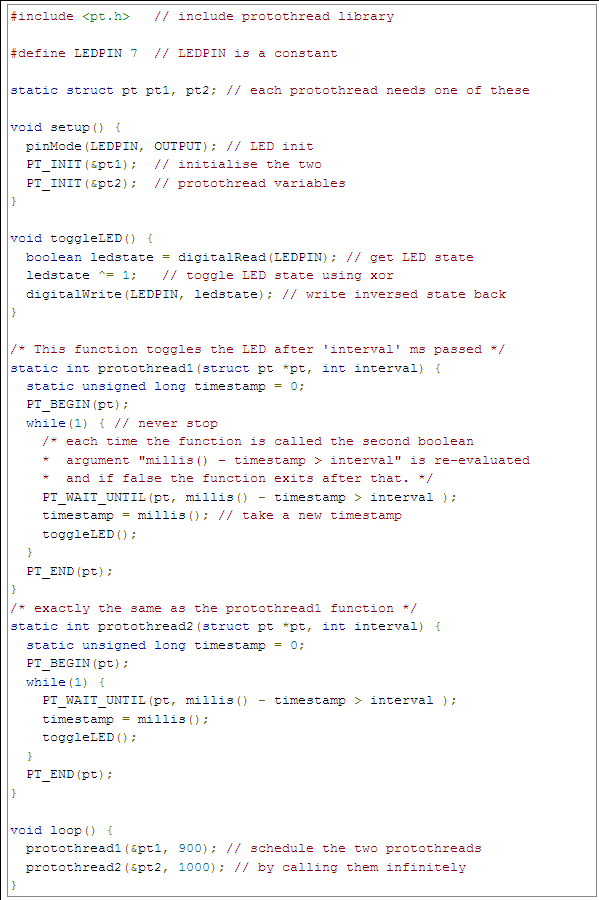
I wrote a little example to demonstrate the possibilities of protothread and an avr µc.
I decided to use some arduino specific functions like pinMode(), digitalWrite() and digitalRead()
because i think this way it is very easy to understand what's happening in the code.
But you should always keep in mind that these functions are up to 50 times slower than direct port access.
It's easy to change the read and write functions to direct port access later on in a project if more I/O power is needed.
For me arduino is a rapid prototyping platform.

What the code does, is that it toggles an LED every n ms using two independent protothreads for it. One pt toggles every 1000ms, the other one every 900ms.
The result is an erratic blinking pattern. Download the protothread library and unpack it into your library directory,
changing the name to 'pt' without version numbers.
I had to delete the file 'example-buffer.c' in the 'pt' dir for some strange compiler reason, after that it compiled just fine.
Dr. Dobb's
- Dr.Dobb's Cheap Threads
On the plus side, protothreads take no direct stack space, and require 2 or 4 bytes of overhead per thread.
On the down side, they are cooperative only, threads lose their local variables and stack context when they block, and you can't use a switch statement inside of a thread.

Actually, library is a misnomer. The entire system is a clever use of C macros and unusual usage of C constructs like switch and while.
Here is a simple protothread (lifted from one of the examples that ships with the library).:
bartjanssen
- Arduino + ProtoThreads http://bartjanssen.be/wordpress/?p=38
After downloading and unpacking, remove “example-buffer.c”, “example-codelock.c” and “example-small.c” from the unpacked directory.
Then copy or move the pt-directory to “Arduino/Java/libraries” and rename it to “pt“.
Then in your Arduino Project include “pt.h” to make use of the library.
- Arduino + ProtoThreads Example ProtoThreads, an approach to get your Arduino Code multi-threaded
After installing protothreads 1.4 delete the example-*.c files from the directory or protothreads will not work!

Download the working example .pde file for Arduino (0022) .
Vijay Kumar
- Vijay Kumar's personal blog Protothreads in Python
Mon, 28 Mar 2011
I did a lightning talk on Protothreads at the ChennaiPy user group meeting last week. This post contains the code examples demonstrated during the talk.

The code was written to show how Protothreads work, but it is not the best way to implement Protothreads.
For one, the examples use 100% of the CPU, because the scheduler does not block. For a more complete implementation, check the source code of the Kiwi project.


